
Post Date: May 18, 2020
Last Updated: November 11, 2026
Introduction
This guide explains how to add swap memory on an AWS EC2 Linux instance, using either a swap file or an extra EBS disk. Swap memory is disk space that Linux uses as overflow when RAM runs out. It helps small instances keep running instead of killing processes with out-of-memory errors.
The original guide covered both methods. This version adds the missing chmod 600 step, a verification step, safer boot entries, and troubleshooting. It also explains that newer Nitro-based instances name the extra disk /dev/nvme1n1 rather than /dev/xvdd.
Warning: Swap is a safety net, not a replacement for RAM. Heavy swapping on EBS is slow and uses disk I/O, and on burstable t-series instances it can drain CPU credits. If you need to add swap memory permanently because your workload keeps running out of RAM, choose a larger instance type. Back up
/etc/fstabbefore editing it, because a wrong entry can cause boot problems.
Prerequisites
Before you add swap memory, make sure you have:
- SSH access to the instance with sudo privileges
- Free disk space at least equal to the swap size you plan to create (check with
df -h) - For Method 2, an extra EBS volume attached to the instance
- A backup of the boot configuration:
sudo cp /etc/fstab /etc/fstab.bak
Architecture
- The EC2 instance runs Linux, and its root EBS volume holds the operating system
- A swap file is a normal file on the root volume that Linux treats as swap space
- A swap disk is a separate EBS volume that you attach and dedicate to swap
mkswapformats the file or disk as swap, andswaponactivates it- An entry in
/etc/fstabmakes Linux enable the swap again after every reboot
The image below shows the workflow. For the official reference, see the AWS guide on allocating swap space with a swap file and the swapon manual.
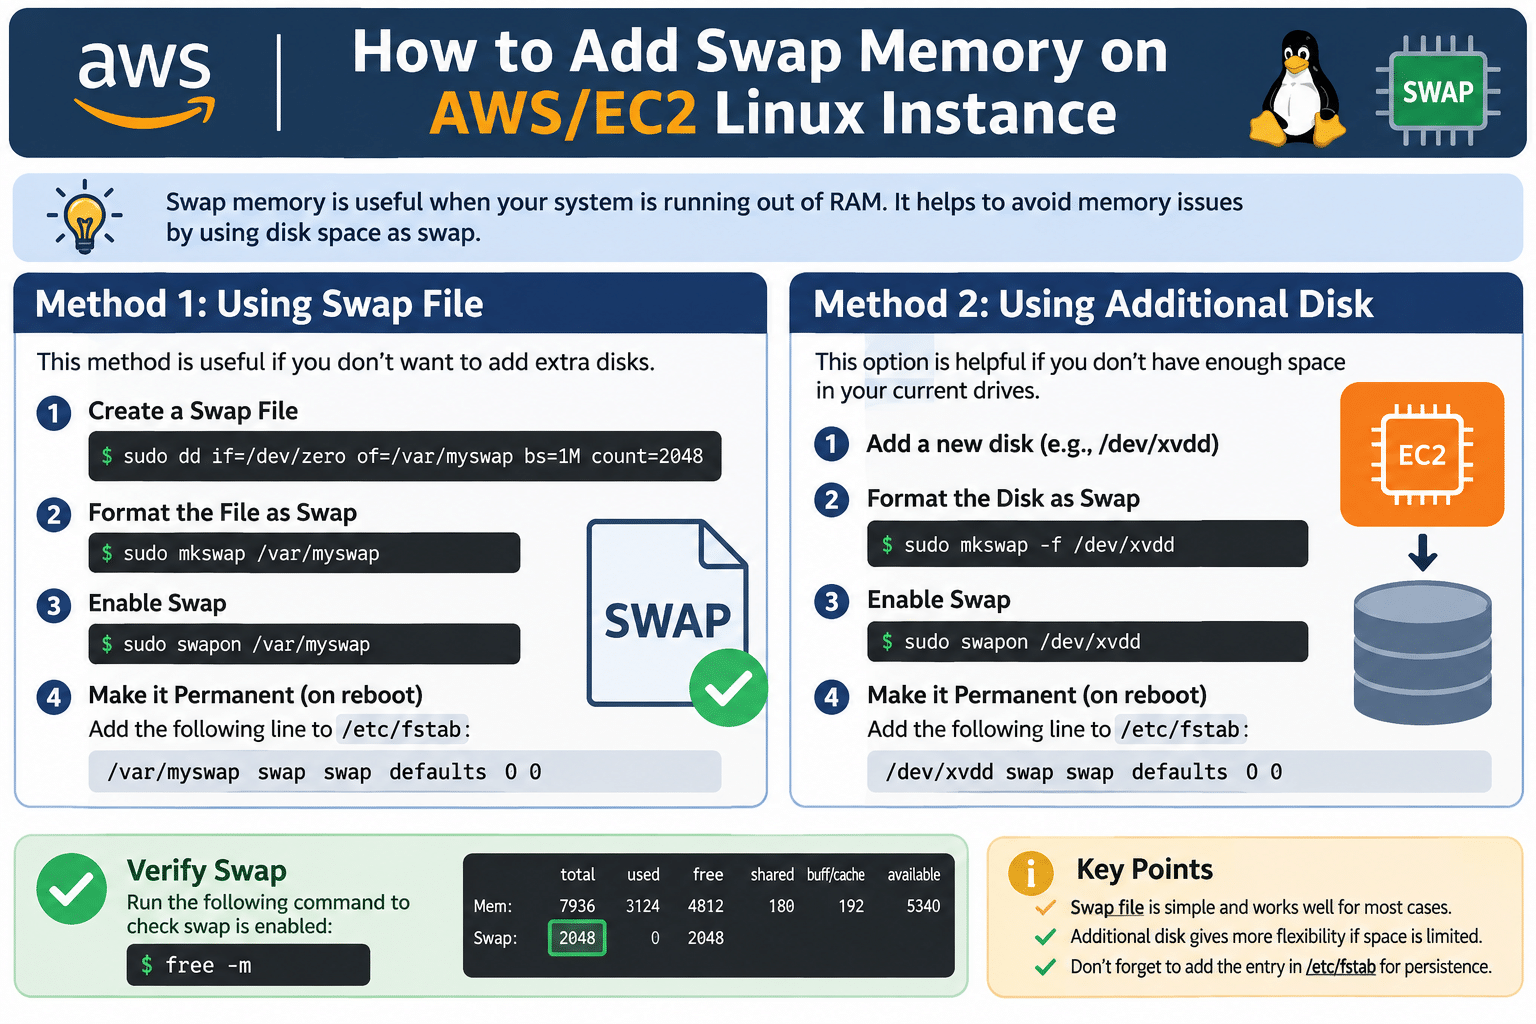
Steps to Add Swap Memory on AWS EC2 Linux Instance
Short answer: To add swap memory on an EC2 Linux instance, create a swap file with fallocate or dd, set its permissions to 600, run mkswap and swapon, then add a line to /etc/fstab so it survives a reboot. If the root disk is short on space, use an extra EBS volume instead.
1. Check Current Memory, Swap and Disk Space
free -h
swapon --show
df -h
If swapon --show prints nothing, the instance has no swap yet.
2. Method 1: Create a Swap File
Method 1 is the simplest way to add swap memory without attaching another disk. This example creates a 2 GB file:
sudo fallocate -l 2G /swapfile
If fallocate fails on your file system, use dd instead (count=2048 with bs=1M gives 2 GB):
sudo dd if=/dev/zero of=/swapfile bs=1M count=2048 status=progress
Restrict the permissions, format the file as swap, and enable it:
sudo chmod 600 /swapfile
sudo mkswap /swapfile
sudo swapon /swapfile
Note: The original guide used
/var/myswapand skippedchmod 600. Without it,swaponwarns about insecure permissions, because other users could read memory pages.
3. Enable the Swap File at Boot
Add the entry to /etc/fstab:
echo '/swapfile swap swap defaults 0 0' | sudo tee -a /etc/fstab
Then confirm the entry is valid:
sudo swapoff /swapfile
sudo swapon -a
swapon --show
4. Method 2: Use an Additional Disk for Swap
Use this method if the root volume has no spare space. You can also add swap memory on a dedicated EBS volume after attaching it to the instance. First identify the disk:
lsblk
The new disk appears as /dev/xvdd on older instance types or /dev/nvme1n1 on Nitro instances. The commands below use /dev/nvme1n1, so replace it with your own device name.
Warning:
mkswap -ferases the disk. Confirm that the device is the new, empty volume and not your root disk.
sudo mkswap -f /dev/nvme1n1
sudo swapon /dev/nvme1n1
Device names can change after a reboot, so use the UUID in /etc/fstab:
sudo blkid /dev/nvme1n1
Add a line with the UUID from the output:
UUID=your-uuid-here swap swap defaults 0 0
5. Verify the Swap Space
free -h
swapon --show
The Swap row in free -h should show the new size. Reboot once if possible, then run the commands again to confirm the swap comes back automatically.
6. Optional: Tune Swappiness
The vm.swappiness value controls how eagerly Linux uses swap. A lower value such as 10 keeps more data in RAM and suits most servers:
cat /proc/sys/vm/swappiness
sudo sysctl vm.swappiness=10
echo 'vm.swappiness=10' | sudo tee /etc/sysctl.d/99-swappiness.conf
Troubleshooting
If swap does not turn on or does not survive a reboot, check these:
- “swapon: /swapfile: insecure permissions 0644, 0600 suggested.”: Run
sudo chmod 600 /swapfile - “swapon failed: Invalid argument”: The file was probably created with
fallocateon a file system that does not support it. Runswapoffif needed, delete the file, and recreate it withdd - “fallocate failed: Operation not supported”: Use the
ddcommand in Step 2 - “dd: error writing ‘/swapfile’: No space left on device”: You cannot add swap memory because the disk is full. Free space or create a smaller file
- “mkswap: /dev/nvme1n1: Device or resource busy”: The disk is mounted or in use. Check
lsblk, unmount it, or confirm you picked the right device - Swap disappears after a reboot: The
/etc/fstabline is missing or has a typo. Compare it with Step 3 or Step 4 - The instance still runs out of memory: Swap is too small or the workload needs more RAM. Raise the size or move to a larger instance type
Conclusion
To add swap memory on an AWS EC2 Linux instance, create a swap file (or attach an extra disk), set secure permissions, run mkswap and swapon, and add the entry to /etc/fstab. Verify with free -h and swapon --show, and reboot once to confirm it persists. Treat swap as a safety net, and upgrade the instance if it swaps all the time.
Frequently Asked Questions
How much swap should I add on an EC2 instance?
For small instances with 2 GB of RAM or less, swap equal to the RAM is a common choice. For larger instances, a smaller amount is usually enough. Swap does not replace RAM.
Is swap enabled by default on EC2?
Most Amazon Linux and other standard AMIs have no swap configured, so you need to create it yourself.
Should I use a swap file or a separate disk?
A swap file is simpler and costs nothing extra. Use a separate EBS volume only if the root volume lacks space, and remember that the extra volume adds cost.
How do I remove swap?
Run sudo swapoff /swapfile, delete the matching line from /etc/fstab, then run sudo rm /swapfile.
Related Articles
AWS EC2 Troubleshooting Guide: Common Issues and Solutions
How to Troubleshoot SSH Connection Issues in AWS EC2
Talk to Our Technology Experts
Running out of memory on your AWS EC2 instances? Our team can size your servers correctly, configure swap and performance tuning, and manage your cloud infrastructure through our DevOps and Cloud Services.