
Post Date: April 27, 2020
Last Updated: November 10, 2026
Introduction
This guide explains how to install Lets Encrypt with Apache on CentOS 7 using Certbot. Let’s Encrypt is a free, open-source certificate authority that issues valid SSL certificates through automated commands. Certificates last 90 days, so automatic renewal is part of the setup.
The original guide had a few errors, and this version corrects them. The Certbot flag was written as -apache instead of --apache. The renewal cron line ran every minute during two hours of the day instead of twice a day. The guide also left out the firewall step and the CentOS 7 end-of-life problem.
Warning: CentOS 7 reached end of life on June 30, 2024 and no longer receives security updates. Before you install Lets Encrypt on it, plan a move to AlmaLinux, Rocky Linux or another supported system. The steps below still work for existing CentOS 7 servers.
Prerequisites
Before you install Lets Encrypt, make sure you have:
- Root or sudo access to the CentOS 7 server over SSH
- A domain name (for example
example.com) whose DNS A record points to the server’s public IP - Ports 80 and 443 open in the server firewall and in any cloud security group
- Working package repositories (see the note in Step 1)
- A backup of any existing Apache configuration
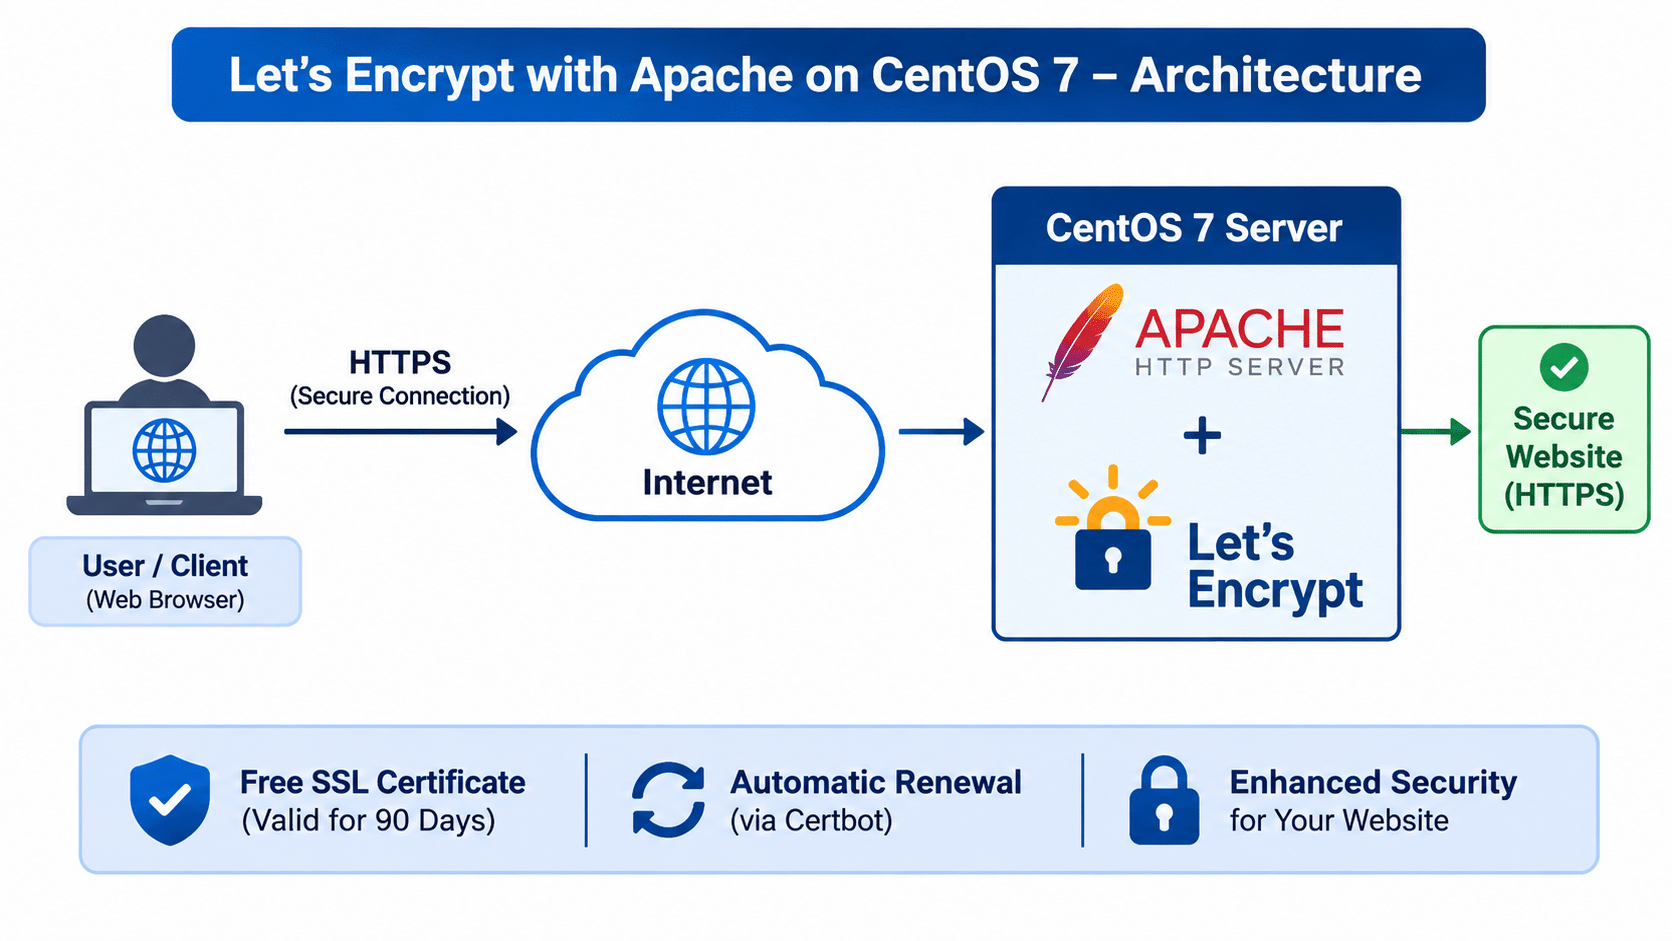
Architecture
- Apache (
httpd) serves the website on port 80 and, after setup, on port 443 mod_ssladds HTTPS support to Apache- Certbot, installed from the EPEL repository, requests the certificate and edits the Apache configuration
- Let’s Encrypt validates domain ownership with an HTTP-01 challenge, which reaches your server on port 80
- Certificates are stored in
/etc/letsencrypt/live/, and a scheduledcertbot renewjob keeps them valid
The image below shows the workflow. For the official reference, see the Certbot documentation and the Let’s Encrypt documentation.
Steps to Install Lets Encrypt with Apache on CentOS 7
Short answer: To install Lets Encrypt with Apache on CentOS 7, add Apache and mod_ssl, enable the EPEL repository, install certbot-apache, and run certbot --apache -d example.com. Certbot obtains the certificate and configures HTTPS. Then schedule certbot renew to run twice a day.
1. Connect via SSH and Update the System
ssh root@your-server-IP -p your-ssh-port
yum -y update
Note: Because CentOS 7 is end of life,
yummay fail with “Cannot find a valid baseurl for repo: base/7/x86_64”. Point the repositories to the archive first:sed -i 's/^mirrorlist/#mirrorlist/; s|^#baseurl=http://mirror.centos.org|baseurl=https://vault.centos.org|' /etc/yum.repos.d/CentOS-*.repo
2. Install and Configure Apache
yum -y install httpd
systemctl start httpd
systemctl enable httpd
Create the document root and set safe permissions:
mkdir -p /var/www/example.com
chown -R apache:apache /var/www/example.com
chmod -R 755 /var/www/example.com
Create a virtual host file:
nano /etc/httpd/conf.d/example.com.conf
<VirtualHost *:80>
    ServerAdmin admin@example.com
    DocumentRoot "/var/www/example.com"
    ServerName example.com
    ServerAlias www.example.com
    ErrorLog "/var/log/httpd/example.com.error_log"
    CustomLog "/var/log/httpd/example.com.access_log" common
</VirtualHost>
Add a test page:
echo "Test - Welcome to the Apache Web Server." > /var/www/example.com/index.html
chown apache:apache /var/www/example.com/index.html
Open the web ports, check the configuration, and reload Apache:
firewall-cmd --permanent --add-service=http --add-service=https
firewall-cmd --reload
apachectl configtest
systemctl reload httpd
Replace example.com with your own domain throughout.
3. Install Certbot
Add mod_ssl and the EPEL repository, then install Certbot for Apache:
yum -y install mod_ssl
yum -y install epel-release
yum -y install certbot-apache
Note: The EPEL package for CentOS 7 is an older Certbot release. It works for this guide, but newer Certbot versions may not be available for CentOS 7.
4. Obtain and Install the SSL Certificate
This is the step where you install Lets Encrypt for your domain. To cover both the root domain and www:
certbot --apache -d example.com -d www.example.com
Certbot asks for an email address (used for renewal notices), asks you to accept the terms of service, and asks whether to share your email with the EFF (optional). It then asks whether to redirect HTTP to HTTPS. Choose option 2 (Redirect) for a new site, so all visitors use HTTPS.
On success, Certbot reports the certificate and key locations and the expiry date. Confirm the files exist:
ls /etc/letsencrypt/live/example.com/
You should see cert.pem, chain.pem, fullchain.pem and privkey.pem.
5. Check Your SSL Certificate
Open https://example.com in your browser and click the padlock icon to view the certificate. You can also check it from the terminal:
curl -I https://example.com
echo | openssl s_client -connect example.com:443 -servername example.com 2>/dev/null | openssl x509 -noout -dates
For a full report, run the Qualys SSL Labs test against your domain.
6. Set Up Automatic Renewal
Test the renewal process first:
certbot renew --dry-run
Then edit the root user’s crontab:
crontab -e
0 */12 * * * /usr/bin/certbot renew --quiet --post-hook "systemctl reload httpd"
This runs twice a day. Certbot renews only certificates that are within 30 days of expiry. In a user crontab, do not add a username field, which was a mistake in the original guide.
Troubleshooting
If you cannot install Lets Encrypt or the renewal fails, check these:
- “Timeout during connect (likely firewall problem)”: Port 80 is blocked. Open it with
firewall-cmdand in your cloud security group, because the HTTP-01 challenge needs it - “Challenge failed for domain”: The domain’s DNS A record does not point to this server, or the virtual host does not match the domain. Check with
dig +short example.com - “Could not choose appropriate plugin: The requested apache plugin does not appear to be installed”: Install
certbot-apacheandmod_sslagain (Step 3) - “Cannot find a valid baseurl for repo”: CentOS 7 repositories have moved to the archive. Use the repository fix in Step 1
- “too many failed authorizations recently” or a rate limit error: Let’s Encrypt limits repeated failures. Fix the cause, wait an hour, and try again, or test with
--dry-run - You cannot install Lets Encrypt because the site is behind a proxy: Use the DNS challenge or point the domain directly at the server during validation
- The padlock shows a warning: Clear the browser cache and confirm Apache is using the new virtual host with
apachectl -S
Conclusion
To install Lets Encrypt with Apache on CentOS 7, set up Apache and mod_ssl, enable EPEL, install certbot-apache, run certbot --apache, and schedule certbot renew. Check that port 80 is open before you start, because most failures come from DNS or firewall problems. Because CentOS 7 is end of life, plan a migration to a supported operating system.
Frequently Asked Questions
Is it free to install Lets Encrypt on my server?
Yes. Let’s Encrypt certificates are free, and Certbot is open source. You only pay for your own server and domain.
How long does a Let’s Encrypt certificate last?
90 days. Certbot renews it automatically when the renewal job runs, and renewal starts 30 days before expiry.
Can I get one certificate for multiple domains?
Yes. Add one -d flag per domain, for example certbot --apache -d example.com -d www.example.com.
Does this guide work on newer systems like AlmaLinux or Rocky Linux?
The Apache and Certbot steps are similar, but the repository and package commands differ. Use dnf and follow the current Certbot instructions for your operating system.
Related Articles
SSL/TLS Configuration and Verification on Linux
How to setup SSL Certificate in Nginx on Ubuntu 20.04
Talk to Our Technology Experts
Need help configuring Apache, SSL, or automated certificate renewals on your Linux servers? Our team can set up and maintain your infrastructure through our DevOps and Cloud Services.
Connect with our technology experts.