
Post Date: January 9, 2020
Last Updated: November 07, 2026
Introduction
This guide explains how to enable MongoDB database authentication on a self-managed MongoDB server. By default, MongoDB deployments do not enable access control automatically. Without authentication, clients that can reach the database may be able to access data without providing a username and password.
Enabling MongoDB database authentication helps protect your database by requiring users to authenticate before accessing it. You can create an administrative user and separate database-specific users with different access permissions.
In this guide, we will create an administrator, enable authentication, create a database-specific user, and verify the connection using the MongoDB Shell (mongosh).
For more details, refer to the official MongoDB documentation on enabling access control
Prerequisites
Before enabling MongoDB database authentication, make sure you have:
- MongoDB installed and running. If you haven’t installed MongoDB yet, refer to our guide: How to Install MongoDB 7.0 on Ubuntu 20.04 and 22.04. You can install the MongoDB version that meets your environment’s requirements.
- Root or sudo access to the Linux server.
- Access to the MongoDB configuration file.
- MongoDB Shell (
mongosh) installed. - A backup of your MongoDB configuration file.
Note: The commands below are intended for a self-managed standalone MongoDB deployment. Replica sets and sharded clusters require additional security configuration.
Architecture
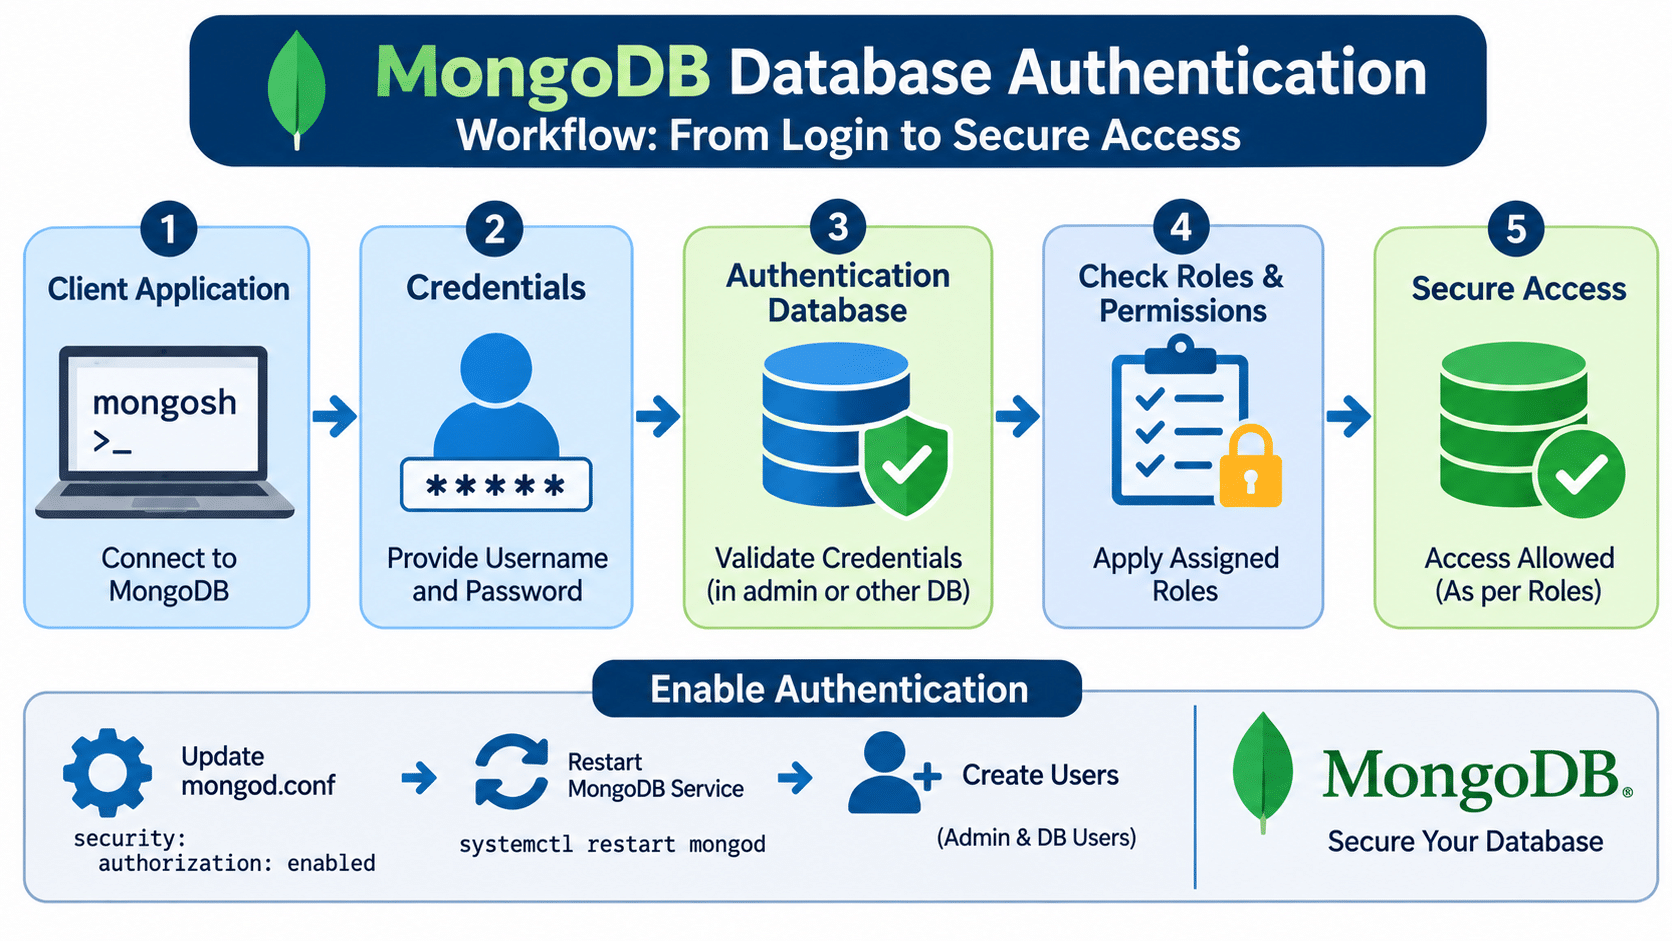
- The MongoDB application connects to the MongoDB server.
- The MongoDB server checks the supplied username and password.
- The authentication database validates the user’s credentials.
- MongoDB checks the user’s assigned roles and permissions.
- The user can access only the resources permitted by those roles.
The following image illustrates how MongoDB database authentication works, from user login to database access.
For more information about MongoDB users and role-based access, refer to the official MongoDB user management documentation.
Steps to Enable MongoDB Database Authentication
1. Connect to MongoDB
First, connect to the MongoDB server using the MongoDB Shell:
mongosh
Switch to the admin database:
use admin
The admin database is commonly used to create administrative users who manage the MongoDB deployment.
2. Create an Admin User
Create an administrative user with the required privileges.
Run the following command:
db.createUser({
    user: "mongo-root",
    pwd: passwordPrompt(),
    roles: [
        { role: "root", db: "admin" }
    ]
})
When prompted, enter a strong password for the administrative user.
The root role provides full privileges across the MongoDB deployment. Use it only for trusted administrators and routine administration where full access is required.
Important: MongoDB does not create a default mongo-root user. You must create the administrative user yourself.
3. Create a Database-Specific User
You can create separate users for individual databases instead of using the administrative account for application connections.
For example, to create a user for a database named dbname, run:
use dbname

db.createUser({
    user: "dbuser",
    pwd: passwordPrompt(),
    roles: [
        { role: "readWrite", db: "dbname" }
    ]
})
The readWrite role allows the user to read and modify data in the specified database.
If the user also needs database administration privileges, you can assign the dbAdmin role:
db.grantRolesToUser("dbuser", [
    { role: "dbAdmin", db: "dbname" }
])
Use only the permissions required by the application. Avoid granting administrative privileges unnecessarily.
For a complete list of available roles, refer to the official MongoDB built-in roles documentation.
4. Enable MongoDB Authentication
After creating the required users, enable access control in the MongoDB configuration file.
Open the configuration file:
sudo vi /etc/mongod.conf
Locate the security section or add the following configuration:
security:
  authorization: enabled
Save the file.
Note: The configuration file may be located elsewhere depending on your operating system and MongoDB installation. Check the MongoDB service configuration if /etc/mongod.conf does not exist.
The authorization: enabled setting ensures that MongoDB requires users to authenticate and applies their assigned roles when accessing database resources.
5. Restart the MongoDB Service
Restart MongoDB to apply the authentication configuration:
sudo systemctl restart mongod
Check the service status:
sudo systemctl status mongod
Make sure the MongoDB service is running successfully.
6. Connect Using the Database User
After enabling MongoDB database authentication, connect using the database-specific user.
Run:
mongosh --host 127.0.0.1 \
  --username dbuser \
  --authenticationDatabase dbname \
  --password
Enter the password when prompted.
Here:
127.0.0.1specifies the MongoDB server address.dbuseris the database username.dbnameis the database where the user was created.--passwordprompts you to enter the password securely.
If you are connecting with the administrative user, use admin as the authentication database:
mongosh --host 127.0.0.1 \
  --username mongo-root \
  --authenticationDatabase admin \
  --password
For more connection options, refer to the official MongoDB Shell connection documentation.
7. Verify MongoDB Authentication
After connecting, switch to the database:
use dbname
Check the authenticated user:
db.runCommand({ connectionStatus: 1 })
Review the authenticatedUsers and authenticatedUserRoles fields in the output.
You can also verify the user’s assigned roles:
db.getUser("dbuser")
If the user connects successfully and can perform only the operations allowed by the assigned roles, MongoDB database authentication is working correctly.
Troubleshooting
If you encounter issues after enabling MongoDB database authentication, check the following:
- Authentication failed: Verify the username, password, and authentication database. A user created in
adminmust authenticate againstadmin, unless another authentication database was specified. - MongoDB service fails to start: Check the YAML indentation in
/etc/mongod.confand review the MongoDB service logs usingjournalctl -u mongod. - Access denied: Verify that the user has the required roles for the database and operation.
- Connection refused: Confirm that MongoDB is running and listening on the expected IP address and port.
- Application connection fails: Update the application’s MongoDB connection string with the correct username, password, and authentication database.
Security recommendation: Do not expose MongoDB port 27017 publicly without appropriate network restrictions. Use firewall rules, restrict bindIp to trusted interfaces, and configure TLS when connections need to travel over untrusted networks.
Conclusion
Enabling MongoDB database authentication is an important step in securing your database server. By creating an administrative user, assigning database-specific roles, enabling authorization in mongod.conf, and verifying authenticated connections, you can control who accesses your MongoDB deployment.
Always follow the principle of least privilege and create separate database users for applications instead of sharing administrative credentials.
Frequently Asked Questions
1. Is MongoDB authentication enabled by default?
No. MongoDB access control is not enabled by default in a standard self-managed deployment. You must enable authorization in the MongoDB configuration file or start the server with the appropriate authentication option.
2. What is the default MongoDB authentication database?
The authentication database depends on how the user was created and the connection options. Users created in the admin database should authenticate against admin.
3. What is the difference between the root and readWrite roles?
The root role provides broad administrative privileges across the deployment. The readWrite role allows a user to read and modify data in a specified database.
4. Can I create multiple users in MongoDB?
Yes. You can create multiple users with different roles and permissions. It is recommended to create separate users for administrators, applications, and database operations.
5. How do I change an existing MongoDB user’s password?
Connect as a user with sufficient privileges, switch to the user’s authentication database, and run:
use admin
db.changeUserPassword("mongo-root", passwordPrompt())
Replace admin with the correct authentication database if the user was created elsewhere.
Related Articles
Data Types and Data Model in MongoDB
How to install MongoDB 7.0 on Ubuntu 20.04 and 22.04
Talk to Our Technology Experts
Need assistance with MongoDB configuration, database security, or Linux server administration? Our team can help you configure secure database environments, manage user permissions, and maintain reliable server infrastructure.