
Introduction
Socket.IO in Cordova enables real-time, bidirectional communication between mobile applications and backend servers. It is widely used in modern applications for features such as instant notifications, live chat, messaging, and real-time status updates.
Traditional HTTP communication requires mobile applications to send repeated requests to the backend server to retrieve updated information. This can introduce delays and unnecessary network requests when an application needs instant updates.
Socket.IO solves this problem by establishing a persistent connection between the client and server, allowing both sides to exchange data through events in real time.
In this tutorial, we will explain how to integrate Socket.IO in Apache Cordova with a Node.js backend server. We will cover installation, server configuration, client-side integration, event handling, and testing to help you implement real-time communication in your Cordova application.
We will cover:
- Installing Socket.IO in a Node.js project.
- Configuring the Socket.IO server.
- Integrating Socket.IO into an Apache Cordova application.
- Connecting the Cordova frontend to the backend.
- Sending and receiving real-time events.
- Testing the connection.
- Troubleshooting common connection issues.
By the end of this tutorial, you will understand how to implement real-time communication between a Cordova mobile application and a Node.js server.
What is Socket.IO?
Socket.IO is a JavaScript library that enables real-time, event-based communication between clients and servers.
It typically uses WebSocket connections and can fall back to HTTP long-polling when necessary.
Some important features include:
- Bidirectional communication: Both client and server can send messages.
- Event-based communication: Exchange information using custom event names.
- Automatic reconnection: Attempts to reconnect when a connection is interrupted.
- Room support: Group connected clients for targeted communication.
- Broadcasting: Send messages to multiple connected clients.
How Does Socket.IO Work?
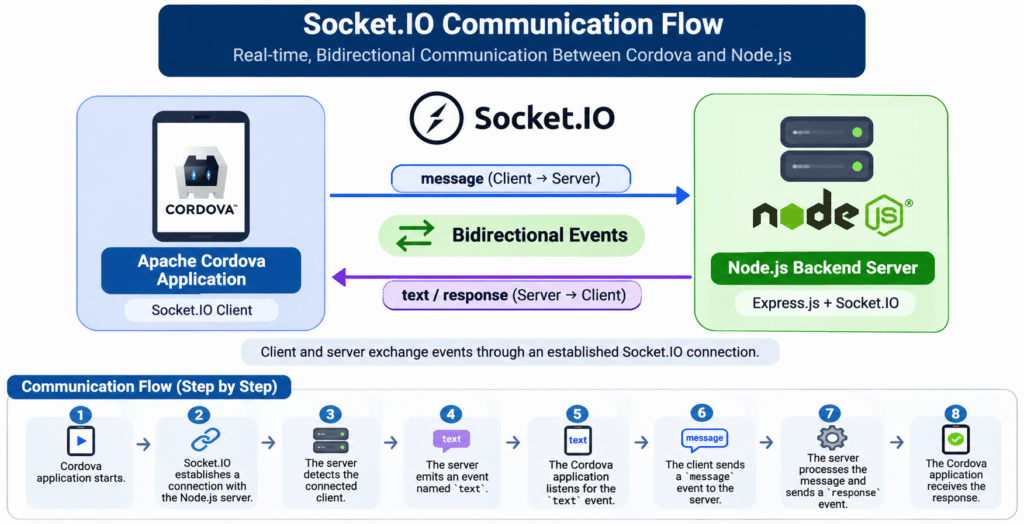
Socket.IO establishes a connection between the mobile application and the backend server.
Once the connection is established, both the client and server can communicate through events.
For example:
- The Cordova application connects to the Node.js server.
- The backend detects the new client connection.
- The server sends a message to the Cordova application.
- The Cordova application listens for the event.
- The received message is displayed or processed immediately.
This makes Socket.IO useful for chat applications, notifications, live dashboards, and real-time mobile applications.
Prerequisites
Before starting the integration, make sure you have the following:
| Requirement | Description |
|---|---|
| Node.js | Installed on the backend server |
| npm | Node.js package manager |
| Apache Cordova | Installed on your development machine |
| JavaScript | Basic JavaScript knowledge |
| Code editor | VS Code or another editor |
| Network | Backend server accessible from the mobile device |
You should also have an existing Node.js backend project and an Apache Cordova project.
Node.js Backend Setup
First, we need to configure Socket.IO on the backend server.
For this tutorial, we are using Node.js with Express.js.
Step 1: Create a Node.js project
If you do not already have a Node.js project, create a new project directory.
mkdir socket-server
cd socket-server
Initialize the Node.js project:
npm init -y
This command creates a package.json file containing the project configuration and dependencies.
Step 2: Install the required packages
Install Express and Socket.IO using npm:
npm install express socket.io
These packages are used for the following purposes:
express: Creates and manages the backend application.socket.io: Handles real-time communication between the client and server.
If your existing project already includes the required dependencies, you do not need to install them again.
Step 3: Create the backend server
Create a file named app.js in the project directory.
Add the following code:
const express = require('express');
const http = require('http');
const { Server } = require('socket.io');

const app = express();
const server = http.createServer(app);

const io = new Server(server, {
    cors: {
        origin: '*',
        methods: ['GET', 'POST']
    }
});

// Check the server connection
app.get('/', (req, res) => {
    res.send('Socket.IO server is running');
});

// Handle Socket.IO connections
io.on('connection', (socket) => {

    console.log('User connected:', socket.id);

    // Send a message to the connected client
    socket.emit('text', 'Wow! Such event. Very real-time.');

    // Listen for messages from the client
    socket.on('message', (data) => {
        console.log('Message received:', data);

        // Send the received message back to the client
        socket.emit('response', 'Message received successfully');
    });

    // Handle client disconnection
    socket.on('disconnect', () => {
        console.log('User disconnected:', socket.id);
    });

});

// Start the server
const PORT = 3000;

server.listen(PORT, '0.0.0.0', () => {
    console.log(`Server running on port ${PORT}`);
});
Code explanation:
express(): Initializes the Express application.http.createServer(app): Creates an HTTP server using Express.new Server(server): Initializes Socket.IO on the HTTP server.io.on('connection'): Detects when a client connects.socket.emit(): Sends an event to a particular connected client.socket.on(): Listens for events from the client.disconnect: Detects when a client disconnects.
The server listens on port 3000 and accepts connections from devices that can reach the server.
Security note: The wildcard CORS configuration is suitable only for a basic development example. In production, configure allowed origins appropriately and use HTTPS/WSS.
Step 4: Start the Node.js server
Run the following command:
node app.js
Expected terminal output:
Server running on port 3000
Your Node.js backend is now ready to accept Socket.IO connections.
Apache Cordova Frontend Setup
Now we will configure the Socket.IO client in the Apache Cordova application.
We assume that you have already created and configured a Cordova project.
Step 1: Open your Cordova project
Navigate to your existing Cordova application directory.
For example:
cd my-cordova-app
Make sure the project contains the required files, such as:
my-cordova-app/
├── config.xml
├── www/
│   ├── index.html
│   ├── css/
│   └── js/
└── platforms/
Step 2: Include the Socket.IO client library
The Cordova frontend needs the Socket.IO client library to establish a connection with the Node.js backend.
There are two common ways to include the client library.
Method 1: Load the client from your Socket.IO server
Add the following script inside the HTML file, before your application JavaScript:
<script src="http://YOUR_SERVER_IP:3000/socket.io/socket.io.js"></script>
For example, if your backend server IP is 192.168.0.7:
<script src="http://192.168.0.7:3000/socket.io/socket.io.js"></script>
This loads the Socket.IO client library served by your backend.
Method 2: Install the Socket.IO client using npm
From your Cordova project directory, run:
npm install socket.io-client
If your project uses a frontend bundler, import it into your JavaScript file:
import { io } from 'socket.io-client';
For a simple Cordova project without a bundler, the server-hosted client script is a straightforward option.
Important: Use a Socket.IO client version compatible with your backend Socket.IO server version. Do not mix incompatible major versions.
Step 3: Connect the Cordova application to the backend
Open your Cordova application’s JavaScript file.
For example:
www/js/index.js
Add the following code:
document.addEventListener('deviceready', function () {

    // Connect to the Node.js Socket.IO server
    const socket = io('http://192.168.0.7:3000');

    // Connection successful
    socket.on('connect', function () {

        console.log('Socket connected:', socket.id);

        // Listen for the text event from the server
        socket.on('text', function (txt) {
            console.log('Server message:', txt);
        });

    });

    // Listen for connection errors
    socket.on('connect_error', function (error) {
        console.error('Socket connection error:', error.message);
    });

    // Handle disconnection
    socket.on('disconnect', function (reason) {
        console.log('Socket disconnected:', reason);
    });

});
Important: Replace 192.168.0.7 with the actual IP address or hostname of your backend server.
The deviceready event ensures that the Cordova application has completed initialization before the Socket.IO connection is created.
Step 4: Send messages from Cordova to Node.js
To test bidirectional communication, send a message from the Cordova application to the backend.
Add the following code inside the connection callback:
socket.emit('message', 'Hello from Cordova application!');
The backend will receive this message through:
socket.on('message', (data) => {
    console.log('Message received:', data);

    socket.emit('response', 'Message received successfully');
});
To receive the backend response, add the following listener in the Cordova application:
socket.on('response', function (data) {
    console.log('Backend response:', data);
});
Now the frontend and backend can exchange messages using Socket.IO events.
Complete Cordova Frontend Example
For easier implementation, the following example combines the connection, event listeners, and message sending into one JavaScript file.
www/index.html
<!DOCTYPE html>
<html>
<head>
    <meta charset="utf-8">
    <meta name="viewport"
          content="width=device-width, initial-scale=1">

    <title>Cordova Socket.IO Example</title>

    <script src="cordova.js"></script>

    <script src="http://192.168.0.7:3000/socket.io/socket.io.js"></script>
</head>

<body>

    <h2>Socket.IO Connection Test</h2>

    <p id="status">Connecting...</p>

    <button id="sendMessage">Send Message</button>

    <script src="js/index.js"></script>

</body>
</html>
www/js/index.js
document.addEventListener('deviceready', function () {

    const socket = io('http://192.168.0.7:3000');

    const status = document.getElementById('status');
    const button = document.getElementById('sendMessage');

    socket.on('connect', function () {

        console.log('Socket connected');

        status.innerHTML = 'Connected to server';

        socket.on('text', function (message) {
            console.log('Server:', message);
        });

        socket.on('response', function (message) {
            console.log('Response:', message);
        });

    });

    button.addEventListener('click', function () {

        if (socket.connected) {
            socket.emit('message', 'Hello from Cordova!');
        } else {
            console.log('Socket is not connected');
        }

    });

    socket.on('disconnect', function () {
        status.innerHTML = 'Disconnected from server';
    });

    socket.on('connect_error', function (error) {
        console.error(error.message);
    });

});
This example displays the connection status and provides a button to send a message to the backend.
4. Testing Socket.IO Communication
After completing the backend and frontend configurations, we can test whether the Socket.IO connection is working correctly.
Step 1: Start the backend
Run the Node.js server:
node app.js
Expected output:
Server running on port 3000
Step 2: Run the Cordova application
For browser testing:
cordova run browser
For Android testing:
cordova run android
Make sure your Android device and backend server can communicate over the network.
Step 3: Check the backend terminal
When the Cordova application connects successfully, the backend terminal should display:
User connected: <socket-id>
Step 4: Check the frontend console
The Cordova application’s browser or remote debugging console should display:
Socket connected: <socket-id>
Server message: Wow! Such event. Very real-time.
When you click the Send Message button, the backend should display:
Message received: Hello from Cordova!
The frontend should then receive:
Backend response: Message received successfully
Expected result Both frontend and backend are communicating successfully through Socket.IO.
Understanding the Communication Flow
Important Configuration and Troubleshooting
While implementing Socket.IO in Cordova, you may encounter connection errors. Here are some common problems and their solutions.
Issue 1: Socket connection failed
Problem: The Cordova application cannot connect to the backend server.
Possible reasons:
- Incorrect server IP address.
- Backend server is not running.
- Firewall blocks port 3000.
- Mobile device and backend server are on different networks.
Solution:
Check whether the backend server is running:
sudo ss -tulnp | grep 3000
Make sure the server is listening on:
server.listen(3000, '0.0.0.0');
Also, verify that port 3000 is accessible from the mobile device.
Issue 2: Incorrect Socket.IO version
Problem: The client cannot establish a connection because the frontend and backend use incompatible Socket.IO versions.
Solution:
Check the installed versions:
npm list socket.io socket.io-client
Install compatible versions of the Socket.IO server and client libraries.
Issue 3: Mixed content or cleartext HTTP blocked
Problem: The application works in a browser but fails on an Android or iOS device.
Reason: Mobile platforms apply network security restrictions. Android may block cleartext HTTP traffic, and iOS App Transport Security may restrict insecure connections.
Solution:
For production applications, configure HTTPS on your backend and connect using:
const socket = io('https://your-domain.com');
For local development, configure the appropriate Android network security settings or iOS ATS exceptions if HTTP is required. Do not leave insecure exceptions enabled in production.
Issue 4: Content Security Policy blocks Socket.IO
Problem: The browser console displays a Content Security Policy (CSP) error.
Solution:
Review the CSP in your Cordova application’s HTML or config.xml. It must allow the backend’s script source and connection endpoints.
For example, a development CSP could include:
<meta http-equiv="Content-Security-Policy"
content="default-src 'self' data: gap:;
connect-src 'self' http://192.168.0.7:3000
ws://192.168.0.7:3000;
script-src 'self' 'unsafe-inline'
http://192.168.0.7:3000;">
Adjust the policy to your actual server, Socket.IO transport configuration, and application requirements. Avoid broad CSP permissions in production.
Issue 5: Multiple event listeners after reconnection
Problem: The same event is processed multiple times after reconnecting.
Reason: Registering event listeners inside the connect callback repeatedly can create duplicate listeners.
Solution:
Register event listeners outside the connection callback:
const socket = io('https://your-domain.com');

socket.on('connect', function () {
    console.log('Connected:', socket.id);
});

socket.on('text', function (message) {
    console.log(message);
});

socket.on('disconnect', function (reason) {
    console.log('Disconnected:', reason);
});
This prevents duplicate event listeners from being registered during reconnection.
Best Practices for Socket.IO Integration
For reliable real-time communication in production applications, follow these recommendations:
- Use HTTPS: Secure communication between mobile applications and backend servers.
- Use compatible versions: Keep Socket.IO client and server versions compatible.
- Handle reconnections: Implement appropriate reconnection and connection-error handling.
- Authenticate connections: Validate users using authentication tokens.
- Validate incoming events: Never trust client-provided data without validation.
- Manage connections: Disconnect sockets when they are no longer required.
- Avoid unnecessary events: Send only the information required by the application.
- Configure CORS and CSP: Restrict access according to your application requirements.
Conclusion
In this tutorial, we explained how to install and configure Socket.IO in Apache Cordova with a Node.js backend.
We covered the backend installation, Socket.IO server configuration, frontend client integration, event handling, message exchange, testing, and troubleshooting.
By integrating Socket.IO, Cordova applications can establish real-time bidirectional communication with backend servers without repeatedly sending HTTP requests to retrieve updates.
This implementation can be extended to develop real-time chat applications, push-style in-app notifications, live dashboards, and other interactive mobile application features.
With the correct server configuration, compatible client and server versions, and secure network settings, Socket.IO provides a practical solution for implementing real-time communication in Cordova applications.
Frequently Asked Questions (FAQs)
1. What is Socket.IO in Cordova?
Socket.IO in Cordova allows mobile applications to communicate with backend servers in real time. It supports bidirectional communication using event-based messaging.
2. Can we use Socket.IO with a Node.js backend?
Yes. Socket.IO can be integrated with Node.js and Express.js to establish real-time connections between the backend and mobile or web applications.
3. Do we need a separate Socket.IO installation for Cordova?
Yes. The Cordova frontend needs the Socket.IO client library. You can load the client script from the Socket.IO server or install socket.io-client through npm.
Related Articles
Need Help with Node.js and Mobile App Development?
Looking to integrate real-time communication into your mobile application or build a scalable backend using Node.js?
Pheonix Solutions helps businesses with Node.js development, Apache Cordova integration, Socket.IO implementation, mobile application development, and DevOps services.
Our team can help you build real-time applications, integrate backend services, and develop efficient mobile solutions.
Get in touch with our team to discuss your project requirements.