Post Date: March 26, 2020
Last Updated: November 11, 2026
Introduction
Sentrifugo is an open-source Human Resource Management System (HRMS) designed to help organizations manage employee information and HR operations. It provides features for managing employee records, leave, attendance, performance, expenses, and other HR-related activities.
Sentrifugo is a PHP-based application built using the Zend Framework and MySQL. It is designed to run on an Apache web server.
In this guide, we will explain how to install Sentrifugo HRMS on a cPanel hosting server using a domain name, MySQL database, and the application’s web-based installer.
Compatibility note: Sentrifugo is a legacy application. Its published documentation lists PHP 5.3 or later, but that does not guarantee compatibility with current PHP releases. Before installing it on a production server, test the application with a compatible PHP environment in an isolated staging account. Do not downgrade PHP for other websites hosted on the same server or expose an unsupported PHP version to the public internet.
Prerequisites
Before starting the installation, make sure you have:
- A cPanel hosting account with access to File Manager and MySQL Database Wizard.
- WHM access if you need to create a new cPanel account.
- A registered domain or subdomain, such as
hrms.demo.com. - A MySQL database and database user.
- A Sentrifugo installation package obtained from a trusted source.
- An Apache-compatible hosting environment.
- PHP extensions required by Sentrifugo, including PDO MySQL, GD, and OpenSSL.
- Apache URL rewriting (
mod_rewrite) enabled. - A valid SSL certificate for the domain.
Implementation
Step 1: Create a Domain or Subdomain in cPanel
First, create a domain or subdomain for your Sentrifugo installation.
For example:
hrms.demo.com
If you have WHM access and need a separate hosting account, create the account through:
WHM → Account Functions → Create a New Account
Alternatively, if you already have a cPanel account, create the subdomain through:
cPanel → Domains → Create A New Domain
Enter your domain name and specify the document root directory.
For example:
/home/username/public_html/hrms
<caption>Example: Create a separate domain or subdomain for the HRMS application.</caption>
Step 2: Configure DNS Records
Point your domain or subdomain to the hosting server’s public IP address.
Open your DNS management interface and create an A record.
| Type | Name | Value |
|---|---|---|
| A | hrms | YOUR_SERVER_IP |
Replace YOUR_SERVER_IP with the actual public IP address of your hosting server.
If you manage DNS through WHM, you can use the DNS Zone Manager or the appropriate DNS management interface.
Allow time for DNS propagation. You can verify the DNS record using:
dig hrms.demo.com
The domain should resolve to your hosting server’s IP address.
Step 3: Create a MySQL Database and User
Sentrifugo requires a MySQL database to store application information.
Log in to cPanel and navigate to:
cPanel → Databases → MySQL Database Wizard
Follow these steps:
- Enter a database name.
- Create a database user.
- Generate a strong database password.
- Assign the user to the database.
- Grant the required privileges.
Record the following details because they will be required during installation:
- Database name
- Database username
- Database password
- Database hostname (usually
localhostfor a local cPanel database)
Important: Sentrifugo’s published guidance mentions that the application relies on MySQL triggers. Confirm that the hosting environment permits the required database operations and privileges before proceeding.
Step 4: Download the Sentrifugo Installation Package
Download the Sentrifugo installation archive from a trusted distribution source.
The original installation guide used the following download link:
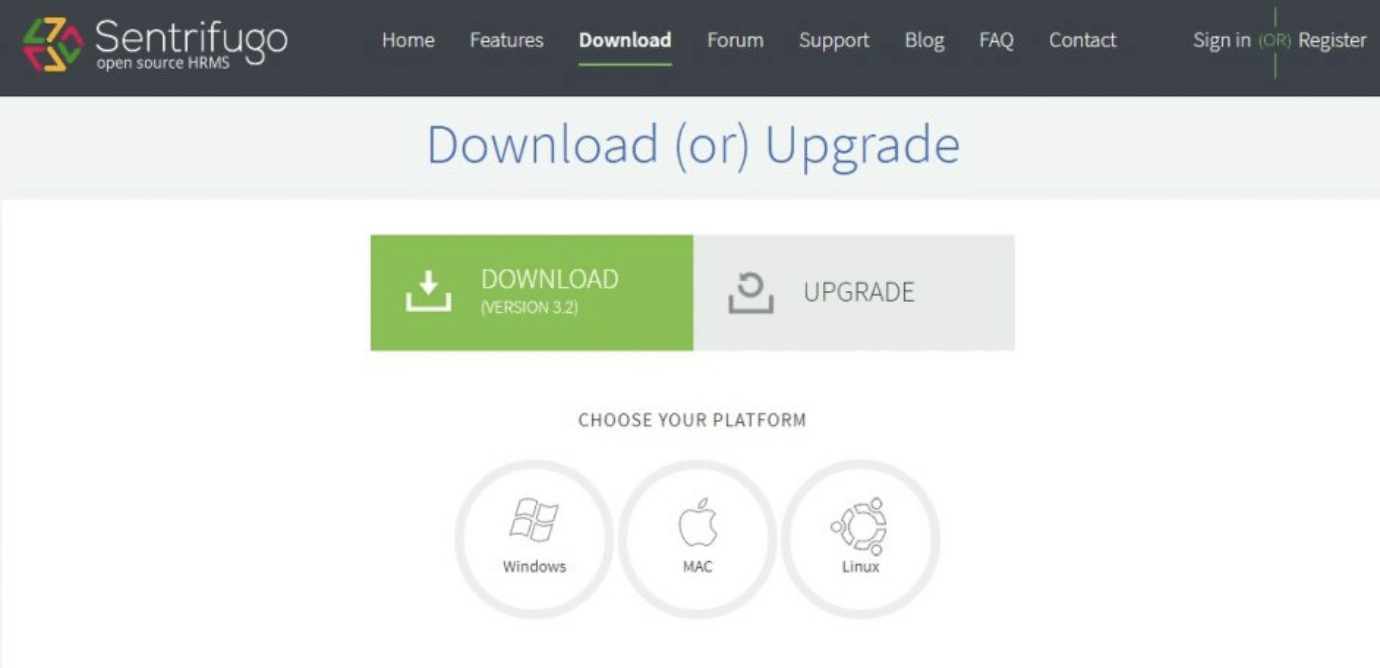
Since this is an old download link, verify that the package is still available and obtain a trusted copy before using it. Avoid downloading application archives from unverified websites.
The published Sentrifugo repository is also available here:
Sentrifugo source code on GitHub
The repository identifies Sentrifugo version 3.1.1 in its installation documentation.
Step 5: Upload and Extract the Installation Files
Log in to cPanel and open:
cPanel → Files → File Manager
Navigate to the document root created for your HRMS domain.
For example:
/home/username/public_html/hrms
Follow these steps:
- Click Upload in File Manager.
- Select the downloaded Sentrifugo ZIP archive.
- Wait for the upload to complete.
- Return to File Manager.
- Select the uploaded ZIP archive.
- Click Extract.
- Extract the files into the intended application directory.
Confirm that the application files, including index.php, are available in the domain’s document root.
<caption>Example: Upload and extract the Sentrifugo installation archive in cPanel File Manager.</caption>
Step 6: Configure PHP Settings and Required Extensions
Sentrifugo’s published installation requirements include PHP and several required extensions.
Check the PHP version assigned to your domain through:
cPanel → Software → MultiPHP Manager
Select the domain and review its assigned PHP version.
Next, check the available PHP extensions through:
cPanel → Software → Select PHP Version (if provided by your hosting environment).
Verify the required extensions, including:
- PDO
- PDO MySQL (
pdo_mysql) - GD
- OpenSSL
Also confirm that Apache URL rewriting is enabled and that .htaccess files are permitted for the application directory.
Note: The availability of older PHP versions depends on the hosting provider and server configuration. Do not enable an end-of-life PHP release on a public production website simply to make this legacy application work.
Step 7: Verify File Permissions
Check that the application files and directories have appropriate ownership and permissions.
Typical permissions are:
| Item | Suggested permission |
|---|---|
| Directories | 755 |
| Regular files | 644 |
| Configuration files containing credentials | 600 or another suitably restrictive permission |
In cPanel hosting, files should normally be owned by the account user. Avoid assigning ownership manually to Apache or using 777 permissions.
If the application requires writable directories, identify the specific directories from its documentation and grant only the necessary permissions.
Step 8: Open the Sentrifugo Web Installer
Once the files, database, and PHP configuration are ready, open your domain in a browser:
https://hrms.demo.com
The Sentrifugo web installer should load if the application files and server configuration are correct.
<caption>Example: Sentrifugo installation welcome page.</caption>
Click Next to continue.
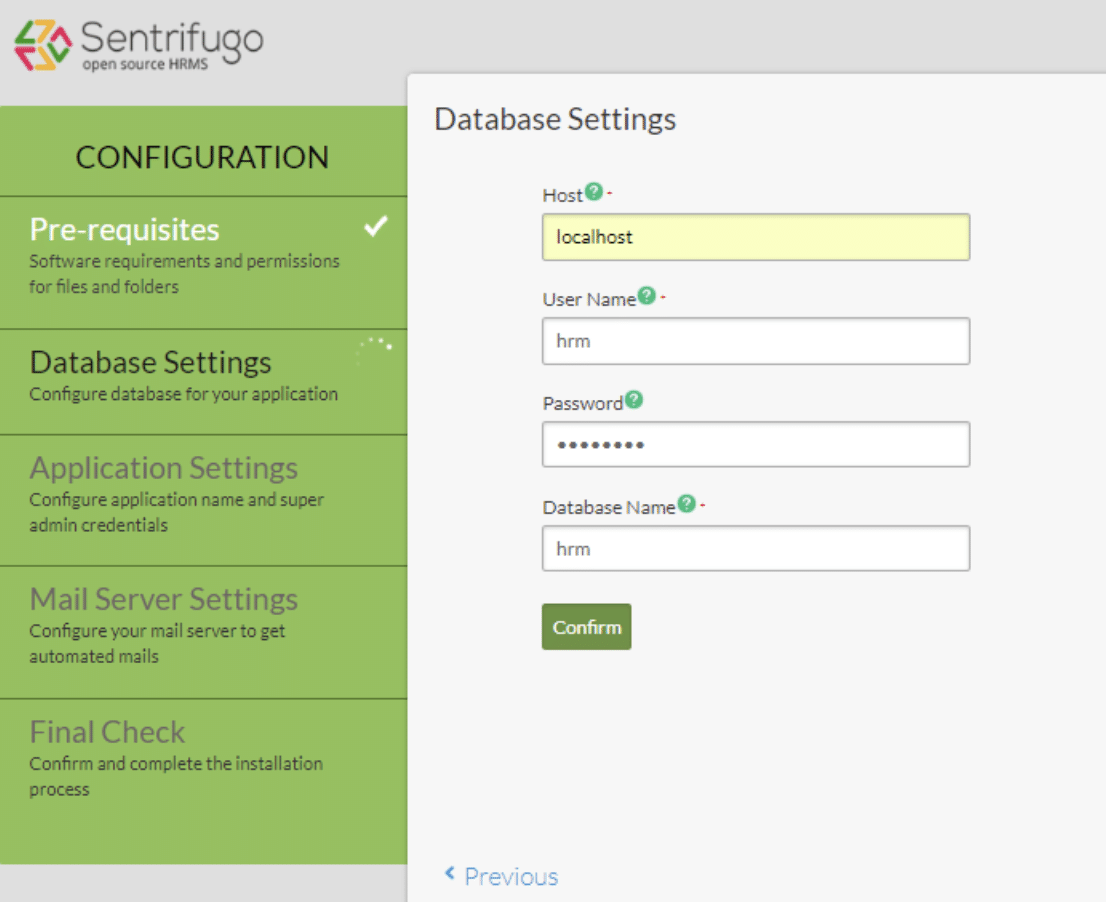
Step 9: Configure the Database Settings
The installer will display the database configuration page.
Enter the database details created in Step 3.
Provide:
- Database hostname
- Database name
- Database username
- Database password
Verify the details before proceeding.
<caption>Example: Enter the MySQL database credentials in the Sentrifugo installer.</caption>
Click Next to continue.
Step 10: Configure Application Settings
After the database configuration is accepted, the installer will display the application settings page.
Enter the required application details, including the Super Admin email address.
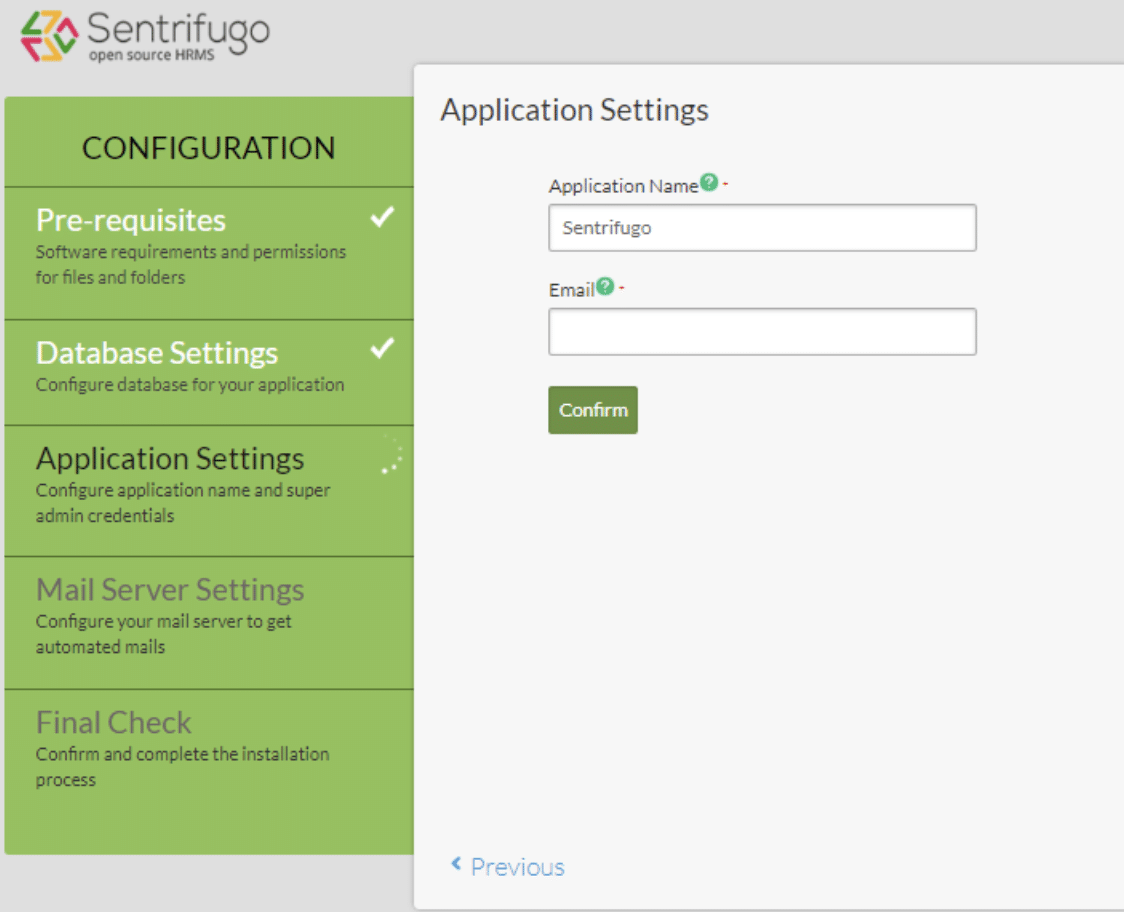
Review the information and proceed to the next step.
<caption>Example: Configure the Sentrifugo application and Super Admin email address.</caption>
Step 11: Configure Mail Server Settings
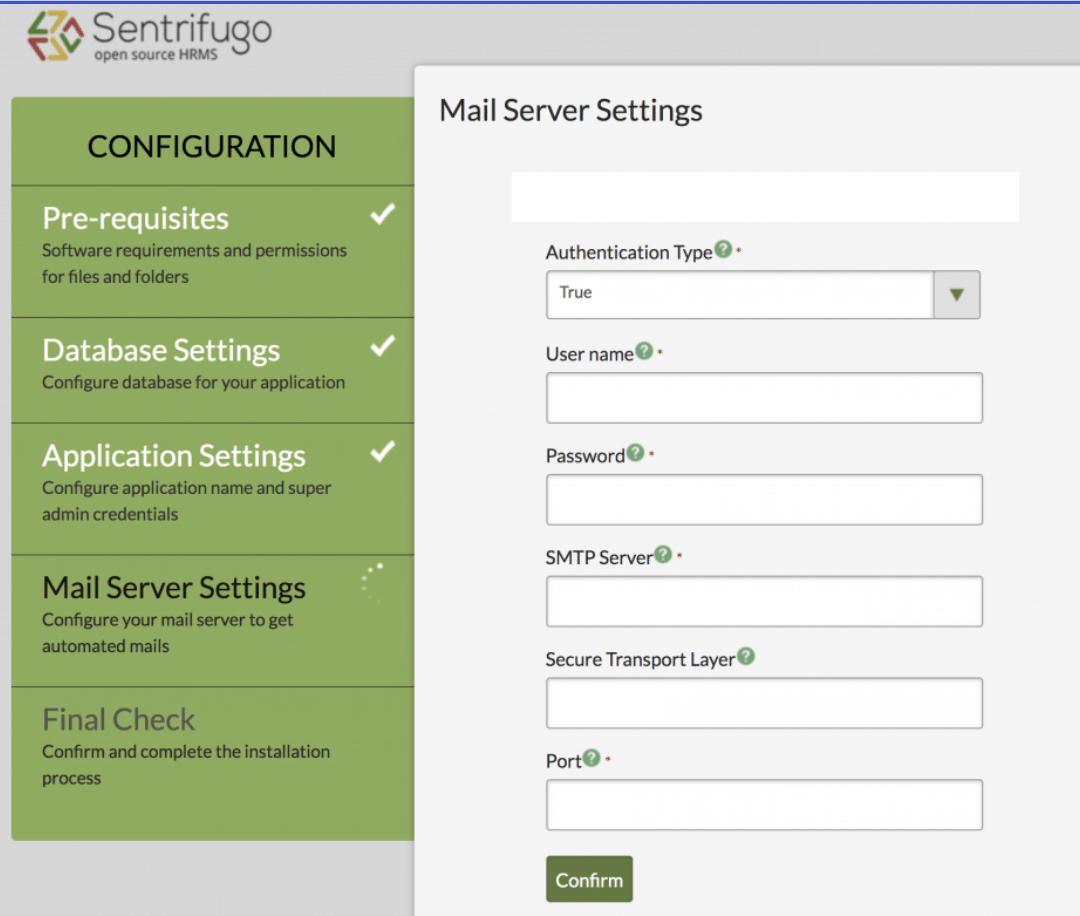
The next page allows you to configure the mail server.
Enter the email server details required by your hosting provider.
Typical settings include:
- SMTP hostname
- SMTP port
- Authentication username
- Authentication password
- Encryption method, if supported
Use the correct SMTP settings provided by your hosting provider or email service.
<caption>Example: Configure SMTP settings for Sentrifugo email notifications.</caption>
Step 12: Complete the Final Installation Check
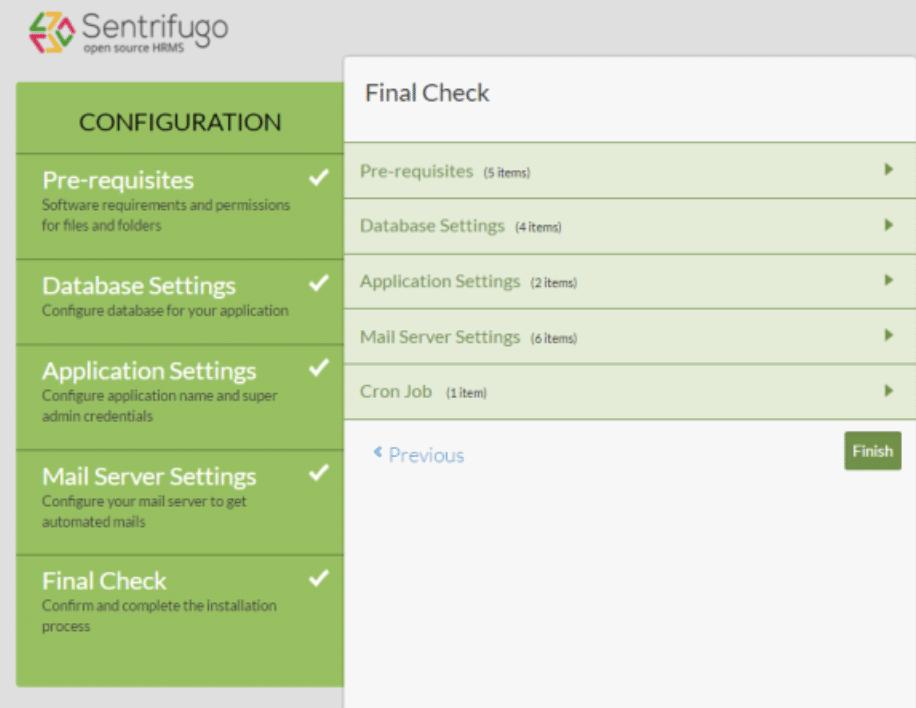
After configuring the database, application, and mail settings, the installer will display the final check page.
Review the displayed information and verify that all required checks have passed.
If any errors appear, review the PHP extensions, database credentials, file permissions, Apache rewrite configuration, and server error logs.
<caption>Example: Review the final installation checks before completing setup.</caption>
Proceed with the installation using the option provided by the installer.
Step 13: Access Sentrifugo HRMS
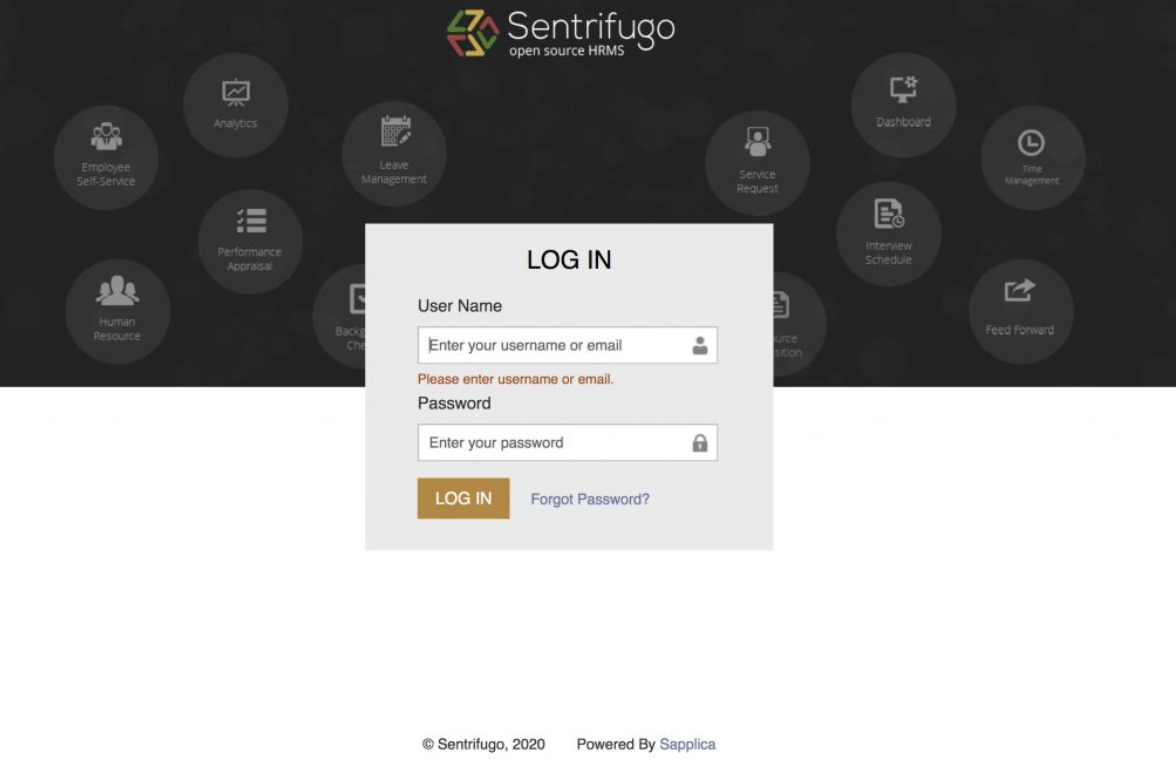
Once the installation is completed successfully, open your domain:
https://hrms.demo.com
You should now be able to access the Sentrifugo HRMS application.
<caption>Example: Sentrifugo HRMS application ready to use.</caption>
Log in using the administrator credentials configured during installation.
Post-Installation Security Checklist
Before making the HRMS application available to employees, complete these security checks:
- Configure HTTPS using a valid SSL certificate.
- Remove or disable the installation scripts and directories if the installer documentation recommends it.
- Restrict access to sensitive configuration files.
- Verify that application files are not writable by unauthorized users.
- Configure regular database and application backups.
- Use strong administrator passwords.
- Verify that email notifications are working.
- Review application and server error logs.
- Test the application in a staging environment before using it for actual employee records.
Because HRMS applications contain sensitive employee information, do not use an unsupported or unmaintained application for production employee data without a security and compatibility assessment.
Conclusion
Sentrifugo is a PHP-based HRMS application that can be installed on a cPanel hosting server using Apache, MySQL, and its web-based installer.
The installation process involves creating a domain, configuring DNS, setting up a MySQL database, uploading the application files, checking PHP requirements, and completing the web installer.
Before deploying Sentrifugo in a production environment, verify its compatibility with the hosting server and review the application’s security requirements.
Frequently Asked Questions
1. What is Sentrifugo HRMS?
Sentrifugo is an open-source Human Resource Management System developed using PHP and the Zend Framework. It provides tools for managing employee information and HR-related operations.
2. Can Sentrifugo be installed using cPanel?
Yes. Sentrifugo can be installed through cPanel File Manager, MySQL Database Wizard, and its web-based installer, provided the hosting environment meets its application requirements.
3. Which database does Sentrifugo use?
Sentrifugo uses MySQL as its database management system.
4. Which web server is required for Sentrifugo?
The published installation documentation specifies Apache. The application also requires URL rewriting through Apache’s mod_rewrite module.
5. Is Sentrifugo suitable for a new production HRMS deployment?
Sentrifugo is a legacy application. Before using it for production employee information, evaluate its maintenance status, PHP compatibility, security, and availability of ongoing updates. Consider a maintained HRMS alternative if ongoing vendor support and security updates are required.
References
- Sentrifugo Official Source Repository
- Sentrifugo Installation Documentation
- Sentrifugo Technical Architecture – SourceForge
- Sentrifugo Installation FAQs
Related Articles
Need Assistance?
Need help installing PHP applications, configuring cPanel hosting, or troubleshooting MySQL and Apache issues?
The Pheonix Solutions technical team can assist with server administration, web hosting configuration, application deployment, and troubleshooting.
For assistance, contact us.