
Post Date: November 05, 2019
Last Updated: November 01, 2026
Introduction
WordPress Multisite is a powerful feature that allows you to manage multiple websites from a single WordPress installation. It enables website administrators to create and manage multiple sites using one centralized WordPress dashboard.
However, while converting a standard WordPress installation into a Multisite network, you may encounter the following warning on the Network Setup administration page:
Warning: An existing WordPress network was detected.
This warning generally indicates that WordPress has detected an existing Multisite configuration in the wp-config.php file or database.
If you are trying to configure a new Multisite network, this existing configuration may prevent you from proceeding with the setup.
In this guide, we will explain how to identify the existing WordPress Multisite configuration and resolve the warning by reviewing the wp-config.php file, checking the database tables, and updating the .htaccess file.
Follow the steps below carefully to troubleshoot the issue and proceed with your WordPress Multisite setup.
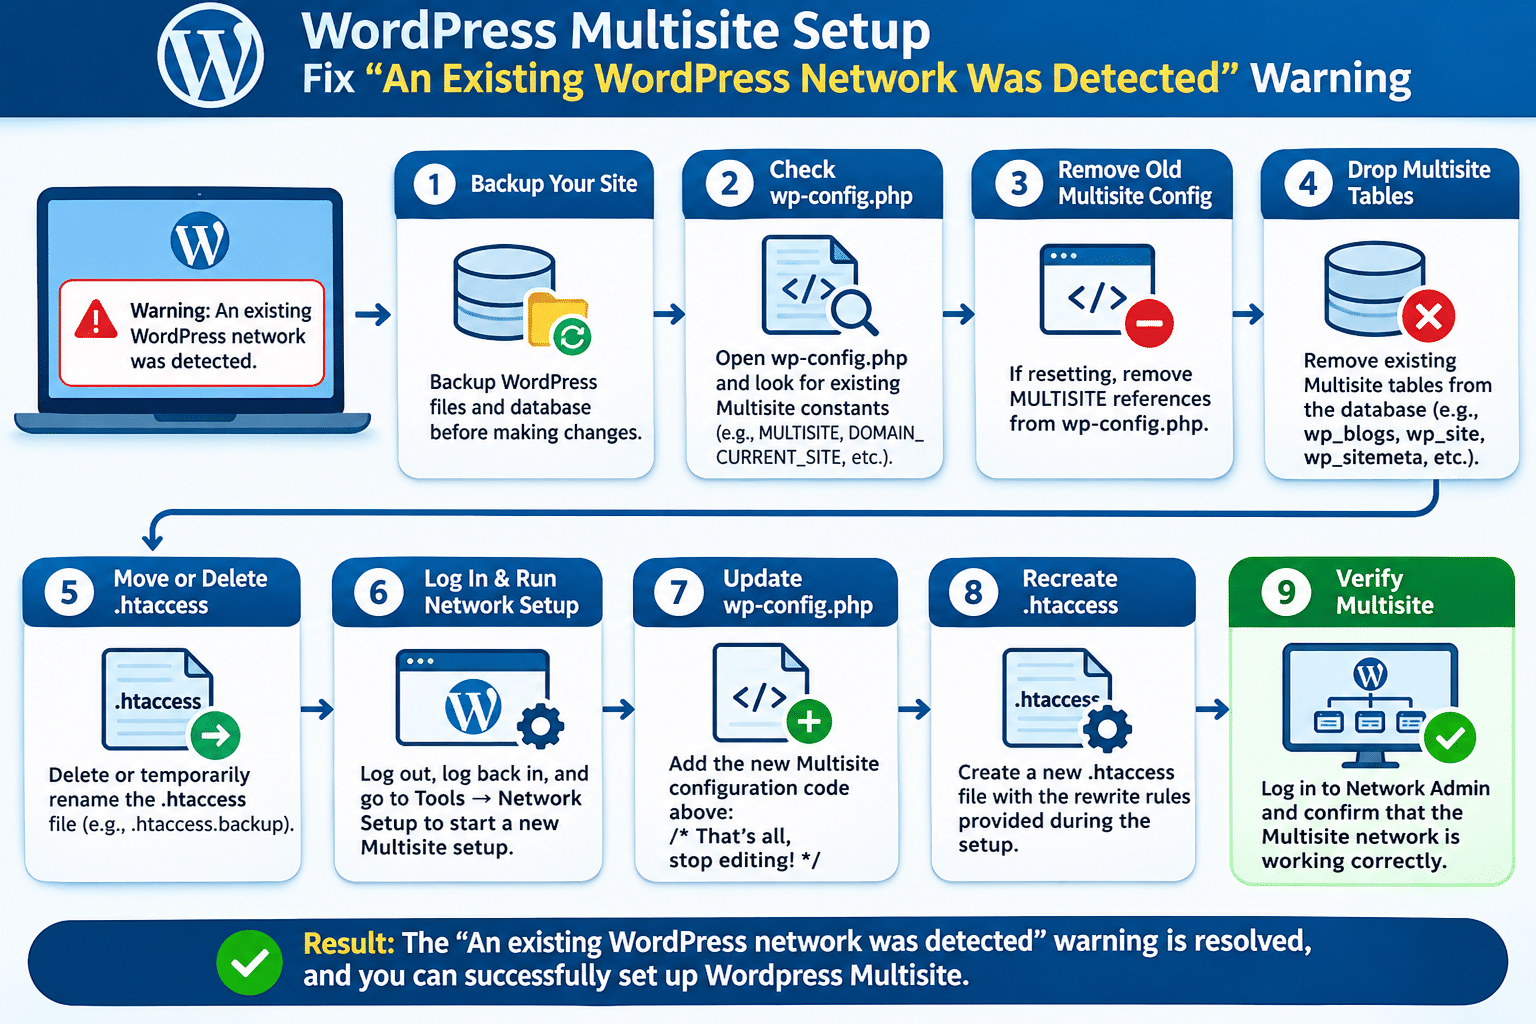
WordPress Multisite Setup – Troubleshooting Flowchar
What Causes the Existing WordPress Network Warning?
The warning can occur when WordPress detects an existing network configuration.
Some common causes include:
- Existing Multisite configuration constants in the
wp-config.phpfile. - Previously configured Multisite database tables.
- An incomplete or interrupted Multisite setup.
- Old network configuration remaining after a previous Multisite installation.
- Existing network settings that were not properly removed.
Before making any changes, identify whether the WordPress installation already contains an active Multisite network.
Step 1: Check the wp-config.php File
First, log in to your server using SSH or access your WordPress installation through the hosting control panel.
Navigate to the WordPress root directory and open the wp-config.php file.
nano wp-config.php
Check whether the following Multisite configuration constants are already present:
define('MULTISITE', true);
define('SUBDOMAIN_INSTALL', false);
define('DOMAIN_CURRENT_SITE', 'rainbowcreed.dev');
define('PATH_CURRENT_SITE', '/');
define('SITE_ID_CURRENT_SITE', 1);
define('BLOG_ID_CURRENT_SITE', 1);
These constants enable and configure WordPress Multisite functionality.
If you are resetting an existing Multisite configuration to create a new network, review these settings and remove the old Multisite constants only after confirming that the existing network is no longer required.
Important: Do not remove these settings if you intend to continue using your existing Multisite network.
Step 2: Take a WordPress Database Backup
Before modifying the WordPress database, create a complete backup.
You can use phpMyAdmin or the MySQL command line to export the database.
Example:
mysqldump -u root -p wordpress_db > wordpress_backup.sql
Replace wordpress_db with your actual WordPress database name.
You should also back up the WordPress files, especially:
wp-config.php.htaccess- WordPress installation files
- Uploaded media files
A backup helps you recover your website if anything goes wrong during the configuration process.
Step 3: Check WordPress Multisite Database Tables
Next, access your WordPress database using phpMyAdmin or the MySQL command line.
Select the appropriate WordPress database and check for the following Multisite-related tables:
wp_blogs
wp_blog_versions
wp_registration_log
wp_site
wp_sitemeta
wp_signups
wp_sitecategories
These tables are commonly associated with WordPress Multisite installations.
Note: The database table prefix may not always be wp_. Your installation may use a custom prefix.
You can check whether these tables exist using the following SQL query:
SHOW TABLES LIKE 'wp_%';
To check specific Multisite tables:
SHOW TABLES
WHERE Tables_in_wordpress_db IN (
    'wp_blogs',
    'wp_blog_versions',
    'wp_registration_log',
    'wp_site',
    'wp_sitemeta',
    'wp_signups',
    'wp_sitecategories'
);
Replace wordpress_db with your actual database name when using the query.
Step 4: Remove Old Multisite Configuration (Only If Resetting)
If you have confirmed that the existing Multisite network is no longer required and you want to completely reset it, you may need to remove its old database configuration.
The following tables are associated with Multisite:
wp_blogs
wp_blog_versions
wp_registration_log
wp_site
wp_sitemeta
wp_signups
wp_sitecategories
Before removing any tables, make sure you have a verified database backup.
Warning: Dropping Multisite tables can permanently remove network configuration, site registrations, and other network-related information. If the existing network contains websites or data you need, do not execute these commands.
If the network is confirmed to be disposable, the following SQL commands can be used:
DROP TABLE IF EXISTS wp_blogs;
DROP TABLE IF EXISTS wp_blog_versions;
DROP TABLE IF EXISTS wp_registration_log;
DROP TABLE IF EXISTS wp_site;
DROP TABLE IF EXISTS wp_sitemeta;
DROP TABLE IF EXISTS wp_signups;
DROP TABLE IF EXISTS wp_sitecategories;
Execute these commands only after confirming the correct database and table prefix.
Important: This is a destructive reset, not a routine fix. Do not use it on a production Multisite installation that you want to preserve.
Step 5: Check and Temporarily Move the .htaccess File
Next, navigate to the WordPress root directory and locate the .htaccess file.
You can temporarily rename it using:
mv .htaccess .htaccess.backup
This preserves the original file while allowing you to generate fresh rewrite rules later.
The .htaccess file contains Apache rewrite rules that help WordPress process website URLs.
Remember that removing or renaming .htaccess alone does not remove an existing Multisite database configuration. It is a separate troubleshooting step.
Step 6: Log Out and Log Back Into WordPress
After reviewing the configuration file and completing the required reset steps, open your WordPress administration dashboard.
Log out of your WordPress account and log back in.
Navigate to:
Dashboard → Tools → Network Setup
Check whether the existing network warning has disappeared.
If WordPress still displays the warning, recheck the configuration constants and database tables to identify any remaining Multisite configuration.
Step 7: Configure WordPress Multisite Again
Once the previous configuration has been safely cleared, you can proceed with the new Multisite setup.
Navigate to:
WordPress Dashboard → Tools → Network Setup
Choose the required network structure:
- Subdomains: Create websites using subdomains.
- Subdirectories: Create websites using subdirectories.
For example:
Subdomain structure:
site1.example.com
site2.example.com
Subdirectory structure:
example.com/site1
example.com/site2
Select the appropriate option based on your website requirements.
Follow the instructions displayed by WordPress to complete the Network Setup process.
Step 8: Update the wp-config.php File
After completing the Network Setup process, WordPress will display the configuration code required to enable Multisite.
Copy the generated configuration and add it to your wp-config.php file.
The configuration should be placed above the following line:
/* That's all, stop editing! Happy blogging. */
Example configuration:
define('MULTISITE', true);
define('SUBDOMAIN_INSTALL', false);
define('DOMAIN_CURRENT_SITE', 'example.com');
define('PATH_CURRENT_SITE', '/');
define('SITE_ID_CURRENT_SITE', 1);
define('BLOG_ID_CURRENT_SITE', 1);
Replace the domain and other values with the configuration generated by your WordPress installation.
Do not blindly reuse the example values if WordPress provides different settings.
Step 9: Update the .htaccess File
After updating wp-config.php, configure the .htaccess file using the rewrite rules provided by the WordPress Network Setup page.
For a subdirectory-based Multisite installation, the rules may look similar to the following:
RewriteEngine On
RewriteRule .* - [E=HTTP_AUTHORIZATION:%{HTTP:Authorization}]
RewriteBase /
RewriteRule ^index\.php$ - [L]

# Add a trailing slash to /wp-admin
RewriteRule ^wp-admin$ wp-admin/ [R=301,L]

RewriteCond %{REQUEST_FILENAME} -f [OR]
RewriteCond %{REQUEST_FILENAME} -d
RewriteRule ^ - [L]

RewriteRule ^(wp-(content|admin|includes).*) $1 [L]
RewriteRule ^(.*\.php)$ $1 [L]
RewriteRule . index.php [L]
The exact rewrite rules can differ depending on your WordPress version and network configuration.
Use the rules generated by your WordPress installation rather than copying an example without checking.
Save the .htaccess file after updating it.
Step 10: Verify the WordPress Multisite Configuration
Finally, log in to your WordPress administration dashboard and verify that the Multisite network is working correctly.
Check the following:
- Open the WordPress dashboard.
- Verify that the My Sites menu is available.
- Open Network Admin.
- Check the network sites list.
- Verify that the main website is accessible.
- Test website URLs and administration pages.
- Confirm that Apache rewrite rules are working correctly.
If all configurations are correct, your WordPress Multisite network should be accessible.
Conclusion
The “An existing WordPress network was detected” warning occurs when WordPress identifies an existing Multisite configuration during the network setup process.
To resolve this issue, carefully review the wp-config.php file, inspect the Multisite database tables, and check the .htaccess configuration.
If you are resetting an old Multisite installation, make sure to take a complete backup before removing any existing network configuration or database tables.
After completing the necessary changes, log back into WordPress and initiate the Network Setup process again.
Following these steps will help you identify the existing configuration and proceed with your WordPress Multisite setup safely.
Frequently Asked Questions (FAQ)
1. What does “An existing WordPress network was detected” mean?
This warning indicates that WordPress has detected an existing Multisite network configuration. It may be caused by Multisite constants in the wp-config.php file or existing network-related database tables.
2. How do I fix the existing WordPress network detected warning?
First, check the wp-config.php file for existing Multisite configuration constants. Then inspect the database for network-related tables. If you are resetting the network, safely remove the old configuration after taking a complete backup.
3. Which database tables are used by WordPress Multisite?
Common Multisite-related database tables include:
wp_blogswp_blog_versionswp_registration_logwp_sitewp_sitemetawp_signupswp_sitecategories
The table prefix may vary depending on your WordPress database configuration.
Related Articles
How to Install / Update WordPress Automatically Without Using FTP
Need Help with WordPress Multisite Setup and Configuration?
Need assistance with WordPress Multisite installation, network configuration, existing network warnings, database issues, or .htaccess troubleshooting? Our experts can help with WordPress installation, Multisite migration, PHP configuration, Apache and Nginx server administration, and website maintenance.
Get in touch with our team here.